Showing posts with label wild kratts. Show all posts

Friday, July 06, 2012

Wild Kratts - Tortuga HQ Pinata

Piñata time! Here is how I made my tortuga HQ:

1.- I took a big bowl and piled up paper balls stuck to one another with tape to make the shape of the turtle's shell. I'm afraid I forgot to take pictures at this stage, but is is pretty easy. Just add paper balls until you feel the shape is just right. Then, cover the whole thing with cling film, several layers. I still needed to make the head, so I used the body of a small plastic bottle as the neck, and a small balloon as the head. The Tortuga HQ's head is not completely round; it has a flat bottom, so I glued a piece of cardboard to the bottom of the balloon and then again covered everything with cling film.

2.- To cover the shape, I used bits of newspaper and engrudo. Engrudo is a paste made of 1 part of flour and 5/6 parts of water. You beat it to make sure there are no lumps, and then you cook it for a few minutes until it thickens, making sure to stir it all the time. Add a tablespoon of vinegar, and you are done. Then, you simply need to place the paper pieces on the shape using engrudo, making sure they slightly overlap one another. Once you have a layer, you let it dry completely (can't tell you how long it will take, as it depends on the humidity in the air, it took me a few hours in Libya, but a complete day here in Trinidad). Then, you apply another layer. I divide my newspapers into black and white and coloured paper and use one kind for each layer, so I will know exactly when my layer has covered every single space. For this piñata I applied 5 layers in all. When it dried completely, I removed the bowl and the paper balls inside the body, and added some wire to the top to hang it from. This is what it looked like:


As you can see, I strengthened the top a little bit, so it could take all the weight of the filling without any problem. I just added a couple more layers of a paper called paper shapers that has glue in in already and you just need to wet it and glue it. You could also do it with masking tape or some extra newspaper layers.

3.- I added little toys, candy and confetti inside. 


Then, I cut a foamboard circle to cover the whole bottom, pierced holes and put about 35 pieces of ribbon hanging from it (one for each kid in the party) and glued it to the turtle using just one layer of paper shaper strips.


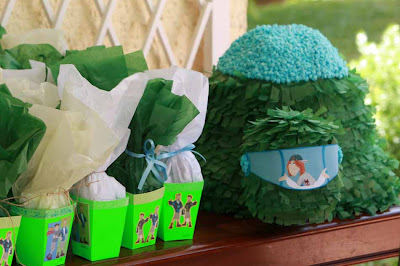
To decorate it, I used tissue paper. I cut strips, made fringes, and glue them all around the shape, one above the other, covering the whole surface so that no newspaper would show.


The top of the Tortuga HQ is a glass widow, so I used light blue paper tissue balls to cover that surface. The final touch? The driver's window in the head, and Jimmy in it. I couldn't find a picture of Jimmy driving the Tortuga, so the one I found had to do.

birthday party, tutorial, tortuga HQ


As you can see from the picture, by the time I got to the favour boxes I was totally and absolutely exhausted and could not face another great creative task, so I simply made some popcorn boxes, added the some washi tape to the top, some Wild Kratts to the front, glued tissue paper to the bottom, wrapped the little gifts in it and tied it with ribbon or hemp.

Now, the best pinata picture. The breaking moment (thanks to the tallest dads in the party, who held the piñata up high!).

ribbons, tortuga headquarters

And yes, it takes days to make it and seconds to break it, but those seconds of utter joy are so worth it!


For those people who wrote to me asking about the piñata, I hope this explanation helps. If you have any questions, leave them here or send me an e-mail, I will be happy to answer them.

Wednesday, June 06, 2012

Pretty Little Studio plus Wild Kratts invitations and banner

I have just received a totally yummy pack from Pretty Little Studio to work on for my Guest DT posts. Wow! I got the sandcastle collection and it is absolutely gorgeous!!!! Just have a look at it:
summer scrapbooking papers embellishments beach

Isn't it fabulous? I am like a kid in a candy store, opening little packs of embellies and thinking of an idea, then changing to a different pack and starting over again. If you are thinking of getting this beautiful collection for your summer pics,  you can click HERE. Living in the Caribbean, I never have enough summer themed supplies, so this is the right collection for me!

But, unfortunately, I can't spend the whole day scrapping away, as I have my  daughter's Wild Kratts' party to prepare. The pinata is almost ready (just missing the wheels of the Tortuga HQ) and I have finished and sent all the invitations. I made this tag:

birthday tag

And I added the birthday info on the back. Then I laminated them, used some twine to tie the tag to a plastic animal (a great way to get rid of some of those animals my daughter has not used in ages). Here is what they look like:

animals


animals

Now, let me tell you. These are not the best designed invitations I have made or the most elegant. But they are surely the most enjoyed! I gave them to their teacher a few minutes before the kids left to put in their backpacks and by the time they got to the bleachers to wait for their parents to collect them, they were all playing with them! And I got several called from parents to tell me how excited their kids were about the party.... now I just need to live up to their expectations.... not easy!

Another thing I have been working on is a banner to put behind the main table as decoration. I wanted to buy one of the lovely PBS ones, but for some reason the fact that my billing and shipping addresses are in different countries didn't let my purchase go through. So, it was time for me to work again. I have already designed the banner and taken it to the printers. I think the PBS problem actually saved me quite a lot of money. Here is the banner:

Now, if you are another poor soul trying to put together a Wild Kratts' party without any party supplies to be bought, and would like me to send you a copy of the tag (minus the cute little girl) or the banner (minus the writing), just send me an e-mail. My address is on the sidebar.

I will be posting an update on the tortuga pinata as soon as the wheels are on, and some other pictures from different party things, so keep coming back! And I won't be able to share my Pretty Little Studio projects yet, but it will be soon enough. And they will come with a giveaway, so you don't want to miss it!!!!

Monday, May 28, 2012

Frugal finds: flower embellishment using a mesh bag!

I love the Frugal Finds feature at Practical Scrappers, it is always play time and creative time, and the results are amazing! For the latest feature we had to use mesh bags and that was an easy one for me, as lots of the produce I can find here comes in mesh bags. For this layout I chose baby pics -probably the fact that my little girl is growing so fast and her front teeth are loose (yet another milestone) influenced the choice of pics for this layout. 
trash to treasure, flower, embellies, scrapbooking,

I love playing with this piece of JBS cardstock and my light blue inks. But the layout needed a girly touch, so I used my mesh to create a flower. It was a bit tricky and I needed the help of the glue gun, but I love how it turned out, especially with that piece of Teresa Collins bling on top. You really MUST check what the other Practical Scrappers designers have created using mesh bags, I promise you will not look at the produce aisle in the same way again!

flower, scrapbooking, crafts, embellies, embellishments, frugal

I am also sharing this project at Scrapscene's WIP Mondays, as I love having my mid-morning coffee and checking what other people are doing. And what exactly am I working on right now? 

tortuga pinata, birthday, pinata,

A Tortuga Headquarters Pinata!!! It's not exactly a beautiful project right now, but it will be!!!! I will keep you posted on how it goes!
 
Site Design By Designer Blogs