Piñata time! Here is how I made my tortuga HQ:
1.- I took a big bowl and piled up paper balls stuck to one another with tape to make the shape of the turtle's shell. I'm afraid I forgot to take pictures at this stage, but is is pretty easy. Just add paper balls until you feel the shape is just right. Then, cover the whole thing with cling film, several layers. I still needed to make the head, so I used the body of a small plastic bottle as the neck, and a small balloon as the head. The Tortuga HQ's head is not completely round; it has a flat bottom, so I glued a piece of cardboard to the bottom of the balloon and then again covered everything with cling film.
2.- To cover the shape, I used bits of newspaper and engrudo. Engrudo is a paste made of 1 part of flour and 5/6 parts of water. You beat it to make sure there are no lumps, and then you cook it for a few minutes until it thickens, making sure to stir it all the time. Add a tablespoon of vinegar, and you are done. Then, you simply need to place the paper pieces on the shape using engrudo, making sure they slightly overlap one another. Once you have a layer, you let it dry completely (can't tell you how long it will take, as it depends on the humidity in the air, it took me a few hours in Libya, but a complete day here in Trinidad). Then, you apply another layer. I divide my newspapers into black and white and coloured paper and use one kind for each layer, so I will know exactly when my layer has covered every single space. For this piñata I applied 5 layers in all. When it dried completely, I removed the bowl and the paper balls inside the body, and added some wire to the top to hang it from. This is what it looked like:

As you can see, I strengthened the top a little bit, so it could take all the weight of the filling without any problem. I just added a couple more layers of a paper called paper shapers that has glue in in already and you just need to wet it and glue it. You could also do it with masking tape or some extra newspaper layers.
3.- I added little toys, candy and confetti inside.
Then, I cut a foamboard circle to cover the whole bottom, pierced holes and put about 35 pieces of ribbon hanging from it (one for each kid in the party) and glued it to the turtle using just one layer of paper shaper strips.
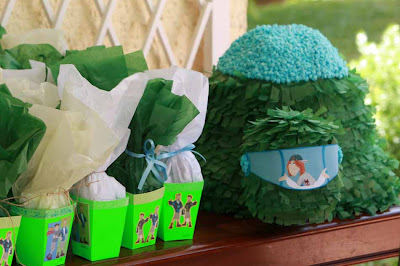
To decorate it, I used tissue paper. I cut strips, made fringes, and glue them all around the shape, one above the other, covering the whole surface so that no newspaper would show.
The top of the Tortuga HQ is a glass widow, so I used light blue paper tissue balls to cover that surface. The final touch? The driver's window in the head, and Jimmy in it. I couldn't find a picture of Jimmy driving the Tortuga, so the one I found had to do.

As you can see from the picture, by the time I got to the favour boxes I was totally and absolutely exhausted and could not face another great creative task, so I simply made some popcorn boxes, added the some washi tape to the top, some Wild Kratts to the front, glued tissue paper to the bottom, wrapped the little gifts in it and tied it with ribbon or hemp.
Now, the best pinata picture. The breaking moment (thanks to the tallest dads in the party, who held the piñata up high!).
And yes, it takes days to make it and seconds to break it, but those seconds of utter joy are so worth it!
For those people who wrote to me asking about the piñata, I hope this explanation helps. If you have any questions, leave them here or send me an e-mail, I will be happy to answer them.


