Wednesday, October 24, 2012

Pumpkins in the living room

My living room has some visitors at the moment:


Yes, they are not the orange, perfect pumpkins that you get in a pumpkin patch for sure, but they are as good as they get here, and we have grown fond of them. Plus, this year we got them directly from the main market, and paid 6 times less than last year for them. What's not to love about that?

Anyway, going to buy the pumpkins for our annual "pumpkin carving with friends" party made me realize I had not worked on any Halloween stuff yet. How is it possible, when there are so many Halloween things around? I've been very busy, but I could always have found some time. The truth is I've gone into leave-it-to-the-last-minute mode. So, quick trip to the fabric store, five minute dash to the crafts store, and I came home with two wreath bases (two front doors... double the work!) and four yards of tulle and some kind of glittery fabric- not sure what it is, I should probably ask my friend Pam Sandy, she is the fabric expert!

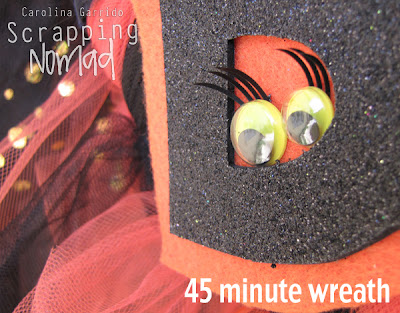
Since I didn't have much time to work on them, as they had to be ready this morning, I just went for a very easy technique: the no sew tutu. The wreath is not a tutu, but it works just perfectly for it. I cut the tulle strips, and alternated three orange strips and three black strips. When I had finished that, I added some strips of glittery fabric, and the wreath was done. It took me about half an hour to finish each wreath, and no tools other than a pair of scissors. Once they were finished, I cut the works BOO and EEK in glittery foam, added a felt background, some googly eyes, and done. Two Halloween wreaths in less than 90 minutes!


Here are some close-ups of the yummy tulle and glittery fabric:


crafts, easy

crafts, easy


Aren't those eye-lashes cute? And while we are talking about Halloween stuff, have you seen the new Halloween classes at the refurbished Art Studio? If you haven't you really should check them:


You can check them all at The Art Studio. And remember, I am taking the Convertible Halloween Mini-album and Banner class (wish I could take them all, they are all so yummy, but, hey, I have to cook sometimes!), so if you are planning to take it, let me know and we can scrap-chat while we work on it. I really want a scrapping buddy. I really, really do!


I had to share this with you... DD was standing on one of the pumpkins (How many times did I tell her not to? Close to a million?) and it burst. YUCK! It was rotten inside, so it splattered the sofa and the wall, and it smells... well, it smell like poop, there's no other way to describe it... so, if you are planning to keep pumpkins inside, do a through inspection daily, and please, don't let your kids stand on them!!!!

Saturday, October 20, 2012

Birthday wrapping with pompons

I am an awful present wrapper. But whenever we give a group present to somebody, since I am the one making the card, the wrapping usually falls in my hands as well, and I always feel embarrassed to be giving a lousily wrapped present to someone who deserves better. So, I have started looking for better wrapping options in Pinterest, and boy have I found some lovely ones.

Armed with lots of courage, this weekend I tried a wrapping idea using pompons with two presents (yes, DD has TWO birthday parties today, one right after the other, am I lucky or what?). I wanted to use kraft paper to wrap the presents but forgot to buy it, so I used fabric instead. DD loves buying fabric and whenever we go by the shop she will beg for a yard of a different colour. It is much cheaper than a toy, and she has some very creative uses for it, so I always give in and buy her some. Plus, I can steal from her stash when I need some!

My first present is for a little princess who is turning four and is, of course, having a Princess Party. Pink was a MUST for this present, and the crown was a cute touch.


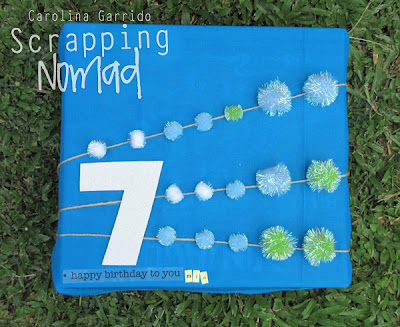
The second one was for a big boy, turning 7, and since this number is so important to him, we wanted to make it part of the wrapping (DD's idea).

fabric


For both presents I simply wrapped them in fabric using my glue gun, added the string lines which I glued under the fabric on one of the sides and then wrapped around the presents, and finally added the pompons, in different colours ans sizes. I cut the crown and seven in glitter foam, and then added a happy birthday sentiment sticker and DD added her name next to it. All in all, a huge improvement from my previous, awfully wrapped presents! DD even asked: "Mom, why are you being so creative today?" Like she can still be surprised about mom getting a sudden burst of unexpected inspiration!


This weekend is bringing big things with it, so come later and pay a visit if you can!


Friday, October 12, 2012

Back for good... I hope!

Whatever did we do before we had internet????? Silly question, since I can't really remember what I did before I had my iPad!!!! :) Anyway, tropical storm Isaac left us with lots of problems in the area, and it has taken ages for everything to be back to normal, but it is finally working, and I really hope this hurricane season doesn't bring any more surprises.


I can't go back and tell you what I have been doing this month, so I'm starting afresh and showing you what I am working on at the moment...


I bought these frames very, very cheap in a sale and honestly thought it was wood.... what a surprise when I took the back off and realised they were plastic! The good thing is that after some sanding the plastic took the ink really well, with a little help of my heat gun (that was just because I couldn't wait!!!).

Keep that colour in mind, it is part of something new and fab coming really soon, I can't tell you more right now, but I will very soon. Another thing I am doing right now is working on some Halloween projects. I am working on some jars to give away to friends (eating lots of artichokes because I love those jars, what a great excuse!) and some bags to hold treats for DD's class. And I am seriously thinking of taking this class:


Online class, art studio, mini album,

The idea of the class is to create a banner to decorate your house during Halloween, and turn it into a Halloween mini-album once the season is over. Two for the price (and especially the work) of one!!! I already took Mo's Punches and Die Cuts class some time ago, and really enjoyed the creative ideas and the sketches, so even though this has been a very busy month (a very busy year!) I think I need to take this one, too. If you are interested, you can find more info HERE. And if you decide to join, please let me know so we can be "scrap buddies". We could chat while we scrap and enjoy the class even more!
 
Site Design By Designer Blogs